Home Excel Tracker Set-up and User Guide
Excel Tracker set up and user guide
This guide is intended to help new users of the Rocket CRM Excel Tracker start using the product quickly.
Have you taken advantage of the Excel Tracker 2-week free trial?
Contents
Use the quick links in the content menu below to navigate the guide. Alternatively, download a PDF version of the Excel Tracker Set-up and User Guide.
Step 1 Installation
Once you have downloaded the solution file (which is a zip file) you are ready to go. Don’t worry for now about the serial key we will send you an email with that.
The first thing we need to do is to import the solution. You will need to be a CRM administrator to do that. If you are not an administrator send this document and the solution file to your CRM administrator to carry out the below.
- Save the zipped solution file to a temporary location and make a note of where you have put it. You do not need to unzip the file.
- Log in to your CRM system
- Open a new tab and type in https://make.powerapps.com. This will open the Power Apps Maker Portal.
- This next bit is important.. You need to be in the right environment. You can check which environment you are in easily. Look in the top right corner of the screen. Here you will see the name of the environment you are currently in. You need to be in the same environment as the Organisation ID that you gave us.

2.1 Import the solution


10. Then click Import.

11. The import process can take a few minutes.


14. Now you can move onto the next section: Assigning Security Roles
Step 2 Assigning the Security Rules to give your team access to the log
Anyone who needs to be able to access the Rocket CRM Export to Excel Tracker, will need to have one of the following two security roles:
- Rocket Export to Excel Tracker – App Access
This Role gives full access to the App and to the logs and includes delete permissions. Anyone with this role can delete the export logs. - Rocket Export to Excel Tracker – ReadOnly Access
This Role gives full access to the App and to the logs but does not include delete permissions. Anyone with this role cannot delete the export logs.
Note 1: Anyone with the System Administrator security role will automatically have access to the App and to the logs BUT will not have access to the Dashboard. To get the best use of the App, System Administrators should also assign themselves the Rocket Export to Excel Tracker – App Access role.
Note 2: You do not need to assign security roles to All Users, only to those that need to be able to see the Export Logs.
The instructions below explain how to give one of the security roles to a user or yourself.
3.1 Assigning a Security Role to a user
- Open the Power Platform Admin centre: To do this, navigate to: https://admin.powerplatform.microsoft.com/home
- Select your environment once again and click on Settings

3. Then, expand + Permissions, then click on Users


Step 3 Adding the product serial key
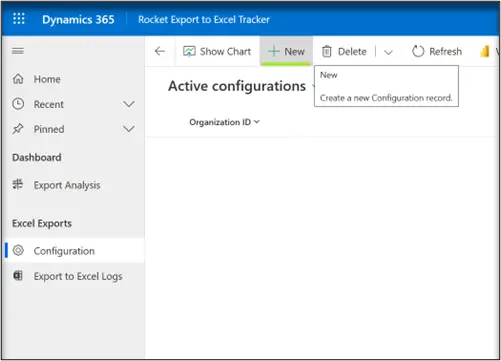
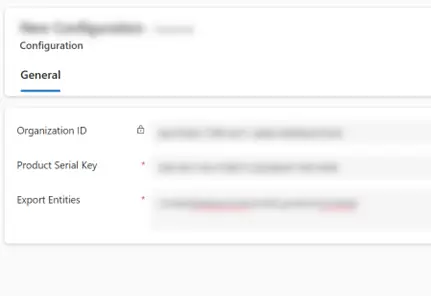
15. Now, in order to complete your installation, you’ll need to add your unique product serial number to the app. You should have received this by email.
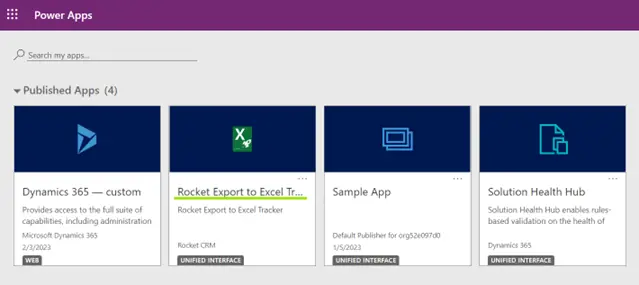
16. Open the new app from the app – selector menu. In order to see the new app, you may need to press F5 to refresh your screen. If F5 doesn’t work, try Ctrl + F5.
Step 4 Choose the tables you want to track the Export for
Next, you must choose which tables you want to track the export of (this can be up to 50 tables).
You need to type in the Schema name of the entities that you want to track the export of in the Export Entities field.
VERY IMPORTANT: It is important that you use the scheme name only and the entries must be separated by a comma and with no spaces in between.
Example: contact,lead,account,rocket_product,Incident
5.1 How to find the schema name of a table
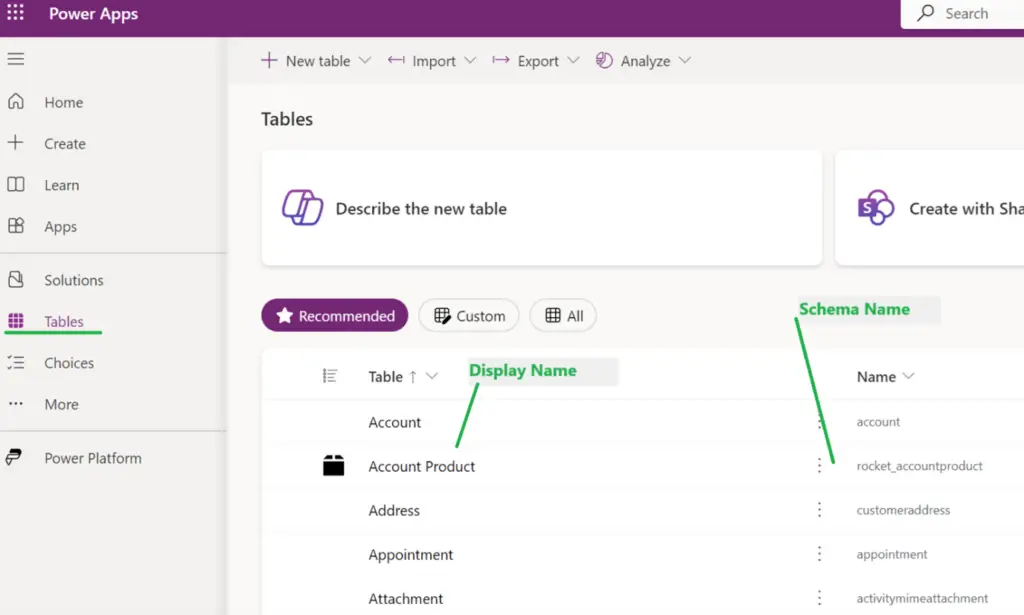
By default you might be tempted to just type in contacts, Accounts, Opportunities, cases etc but this won’t work as these are the display names of the tables.
Here are the steps to find the schema name of a table:
- Open a new tab and type in https://make.powerapps.com. This will open the Power Apps Maker Portal. If you need to change the environment click on the name in the top right and select the correct one from the drop down list.
- Once you are in the right environment, navigate to Tables in the navigation pane on the left side.
- You will see the list of CRM tables on the right. The Name column is the schema name. see below:
Step 5 Rocket CRM Export to Excel Tracker
6.1 When is a log created?
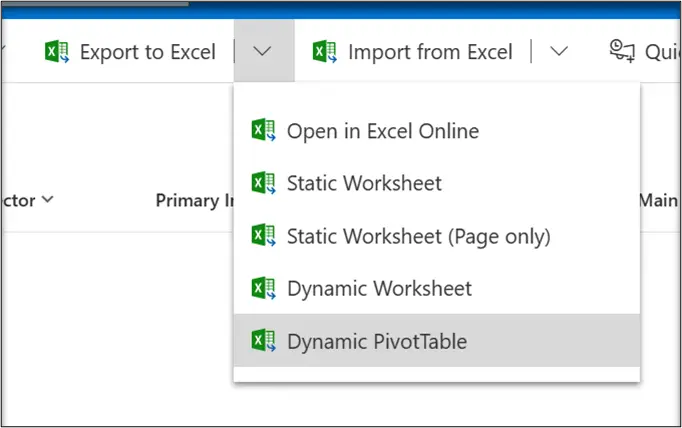
You are now ready to start viewing logs. Everytime someone exports data in the following scenarios a log will be created.
• Someone clicks
o The Export to Excel button
o Open in Excel online (this scenario will actually create two logs because the system makes two calls to the API)
o Static Worksheet
o Static Worksheet (Page Only)
o Dynamic Worksheet
o Dynamic PivotTable
Note: in the case of the Dynamic Worksheet or Dynamic PivotTable, a log will also be created each time the data is refreshed in the Dynamic spreadsheet.
6.2 Viewing a log
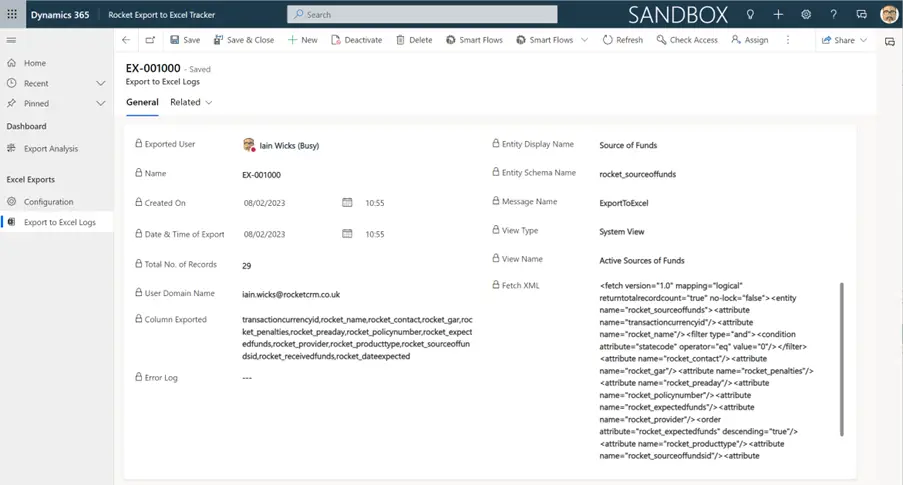
Some of the information available from the Export to Excel log includes:
- Exported User: The user who initiated the export.
- Date and Time of Export.
- Total No of Records.
- Columns Exported.
- Entity Display Name: The name of the entity/table that was exported.
- Message Name: this will tell you the type of export.
o ExportDynamicsToExcel: This is a Dynamic Worksheet of PivotTable.
o ExportToExcel: This is a standard data export from the button or export menu.
o ExportToExcelOnline: This shows when a user exports data to Excel Online. - View Type: Whether system view or personal view was exported.
- Fetch XML: This is the criteria for the records that are exported.
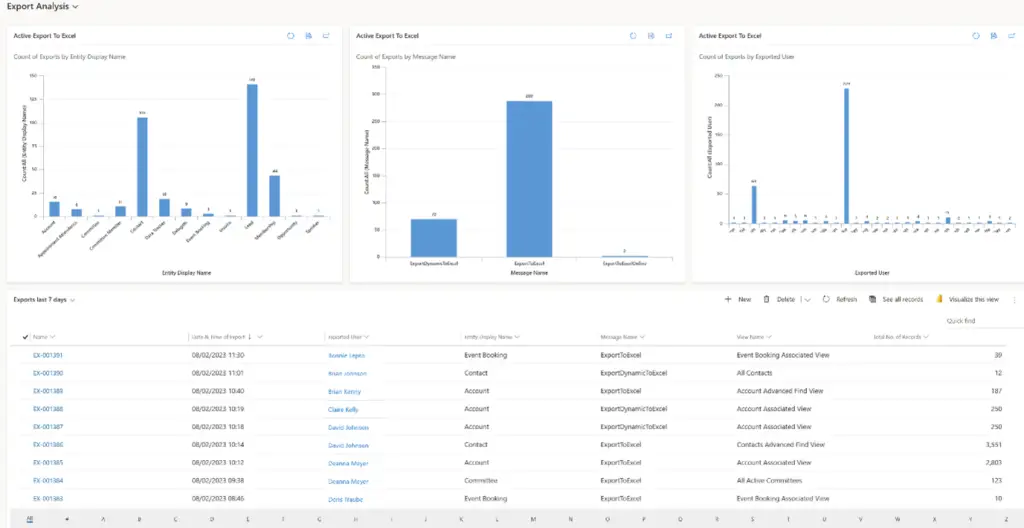
Step 6 Export Analysis Dashboard
Step 7 Troubleshooting
If you find that you are getting an error in the logs and they have stopped capturing information, your subscription may have expired, or there may be a problem authenticating your license. In either case, please reach out to the Rocket CRM team at support@rocketcrm.co.uk for advice.
