
Learn how to create Dynamics 365 Word Templates in 9 easy steps
Dynamics 365 natively integrates with the Microsoft Dynamics 365 suite of products which includes Word. There are third party vendors (see link at bottom page) with products that extend the functionality available from Microsoft, especially for document creation, management and storage. However, its always worth taking a look at what is available already and for free!
Why Create Dynamics 365 Word Templates?
Simply by creating a template in Word and linking it with Microsoft Dynamics 365, you are able to generate a standalone Word document automatically populated with the Dynamics 365 data you need from a record. You can organise the data within the template to the required layout and format and use it with records from one or more related entities.
Creating a template once allows users to create the document at the click of a button. It has its uses with tasks and customer requests like creation of quotes, invoices, tax receipts and thank you letters. You could even use it to list your client or company assets.
Create a Word templates in 9 steps:
The easiest way to create a Word template is from within a record in Dynamics.
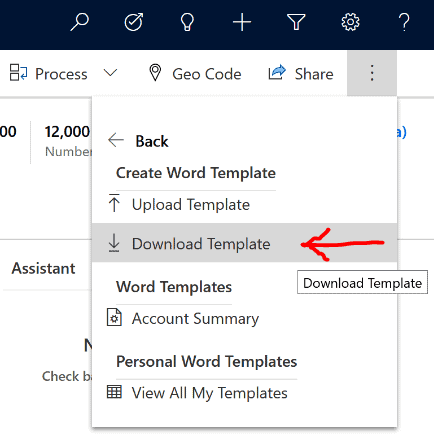
Step 1:
Go into a record within the entity for which you would like to create a template for example: an Account record. Go to the ribbon at the top and select Word Template (you may have to click the ellipsis to reveal this), then click Download Template.
Step 2:
A “Download file to create a template” pop up appears. Select the entity – which will be pre-populated with Account as per point 1. You can then select related entity records associated with our chosen (primary) entity. Then click download.
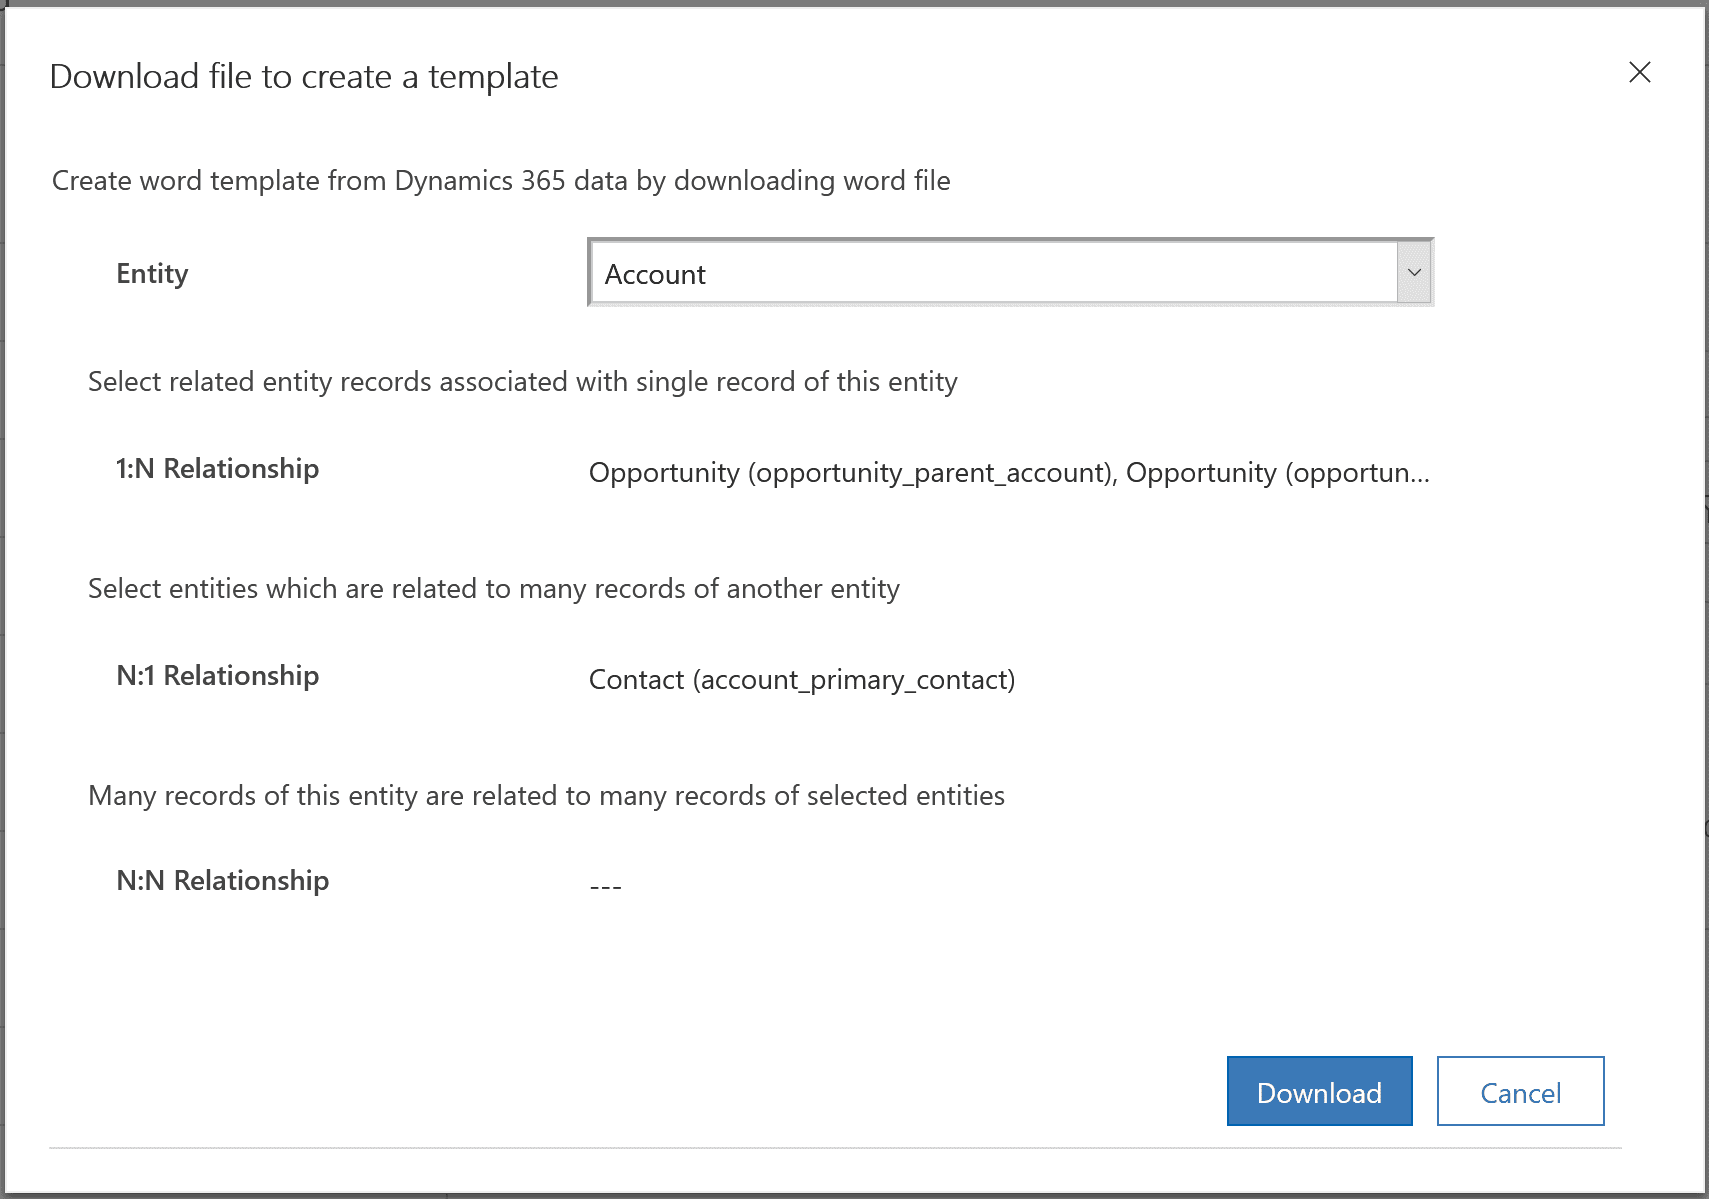
You will then be asked to Open or Save the file.
Note: if saving the downloaded template it is advisable to do so in an appropriate file name and folder.
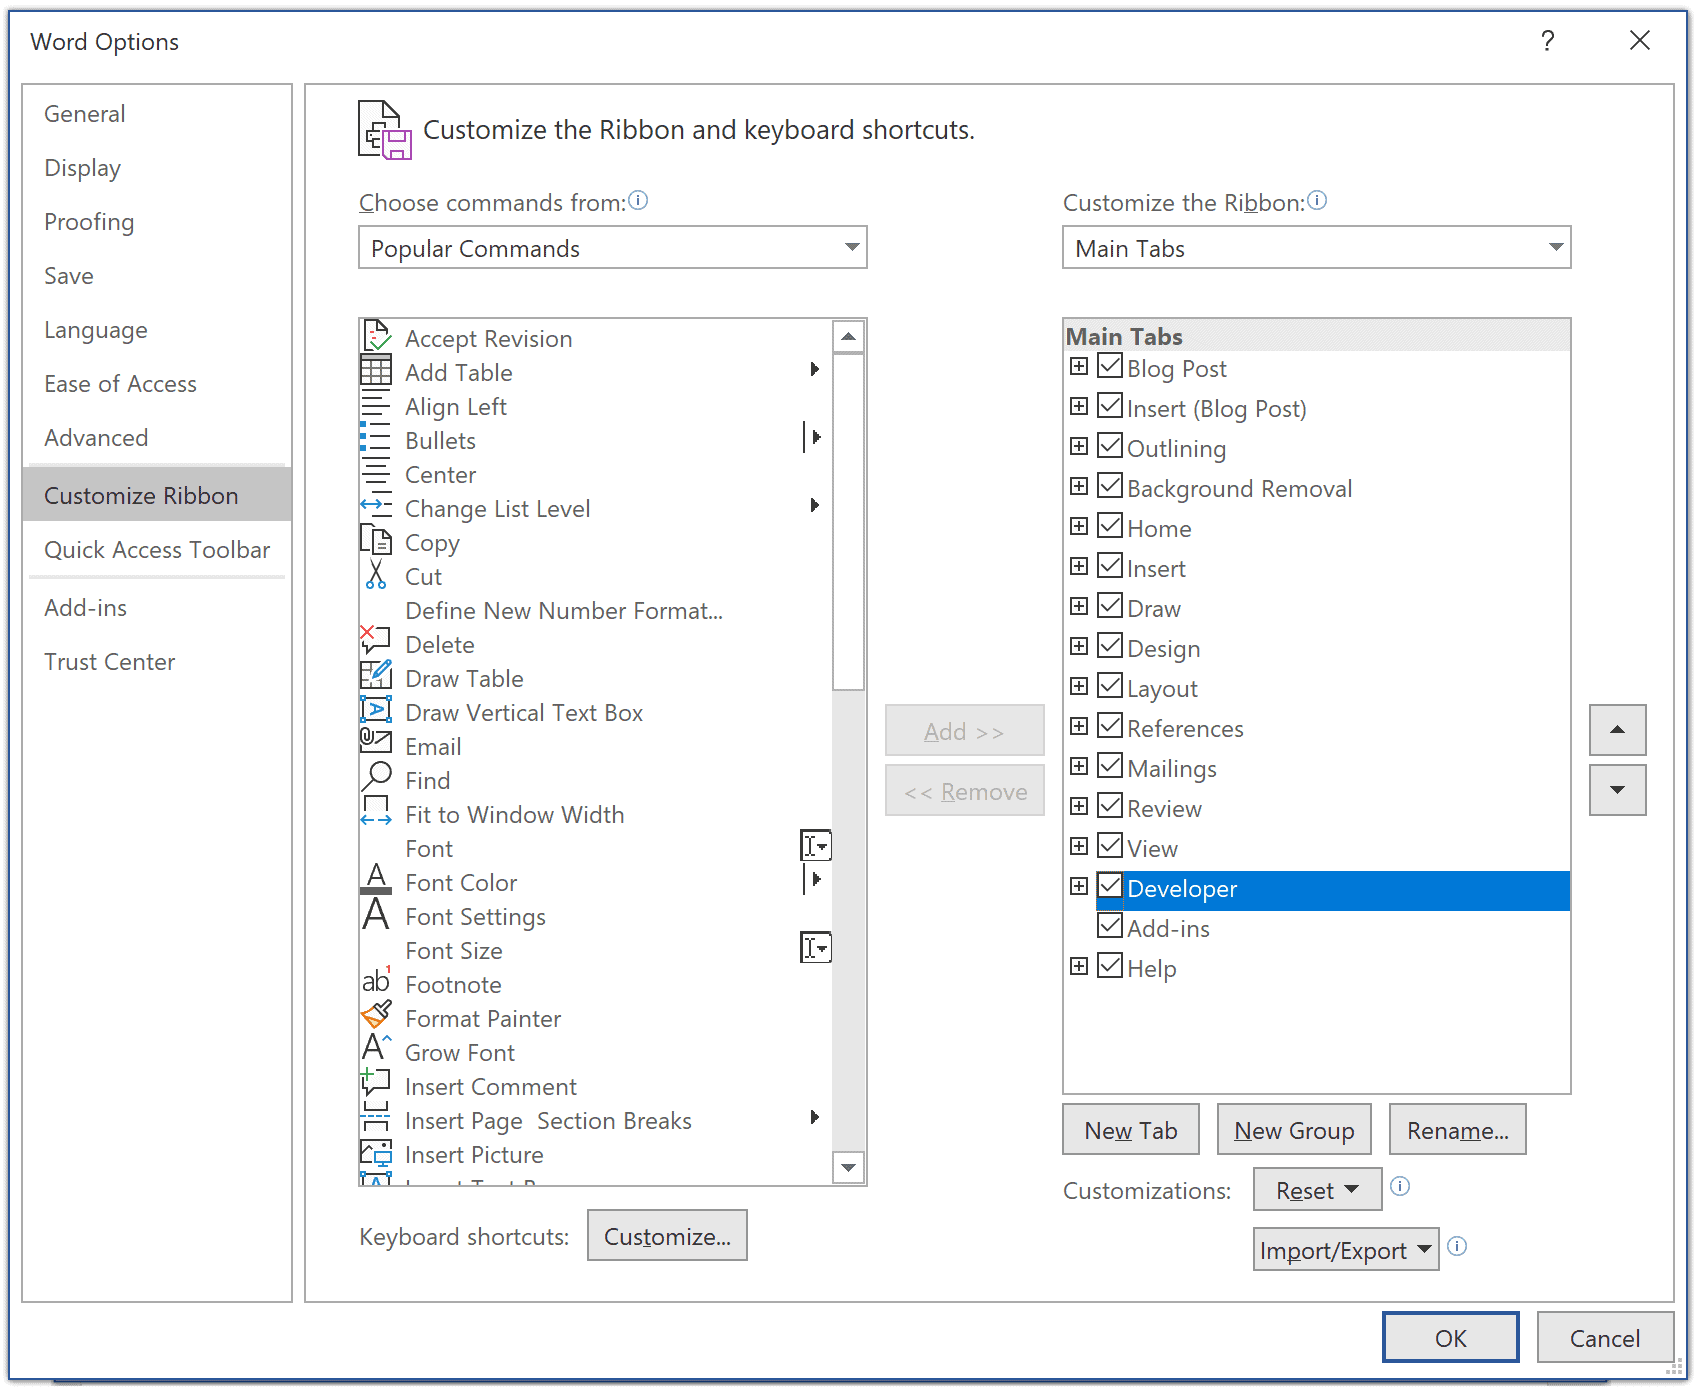
Step 3:
Once open, you will see a blank template in Word. Enable editing in the yellow ribbon. We now need to add the Developer tab if you do not have it already. To do this, go to File/Options/Customise Ribbon. You may have to choose the Developer command from the table on the left and then add in to the right, either way check the box in the Customise the Ribbon table on the right and then press OK. I should point out that you only have to do this once. When creating subsequent templates the developer tab will already be exposed.
Now, lets start to create our template. I will create a generic customer contact letter. Start to write the letter and wherever there is a requirement for data to be populated from Dynamics we can add it in, the next 3 points explain how.
Step 4:
In the Developer tab click XML Mapping Pane. This has the mapped data we chose from Dynamics. A window appears on the right, use the drop-down and select the option that contains “… microsoft-crm/document-template …”.
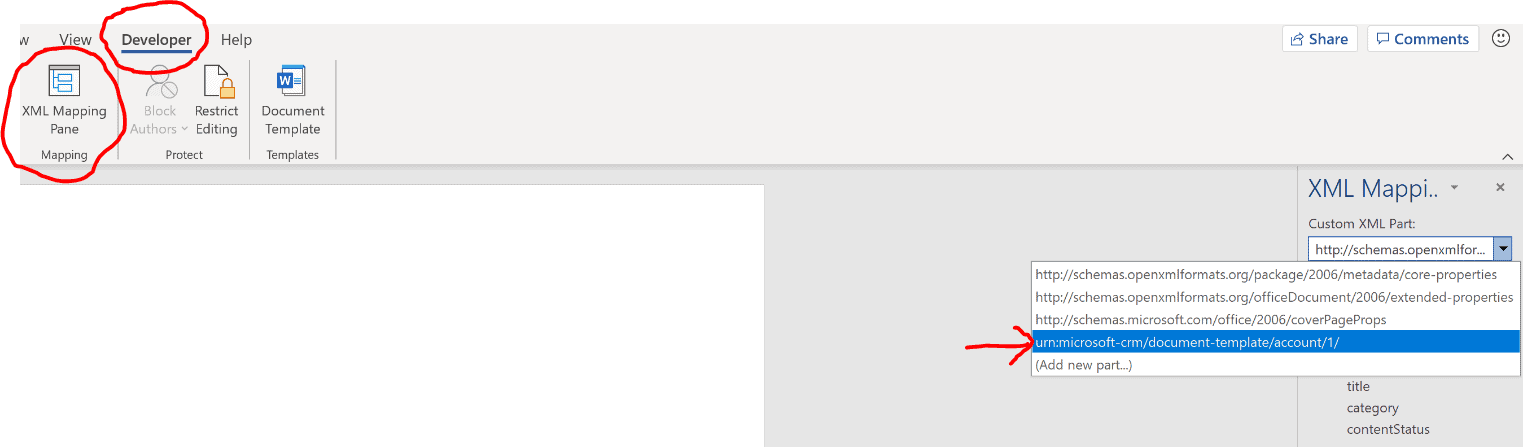
You will see below this the primary entity appears.
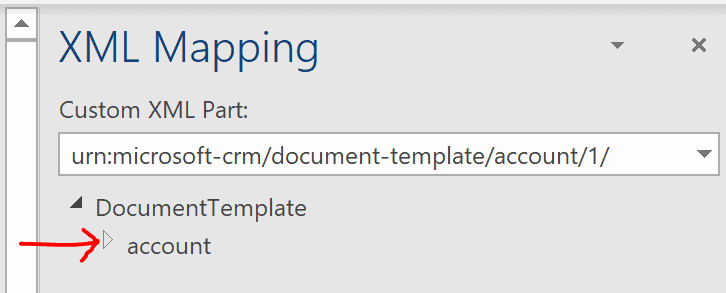
Clicking on the triangular node (indicated above) will list all of the available fields from this entity that can be used in the template. Scrolling to the bottom will show the other related entities and clicking on the triangle next to them will show their available fields to use. You will need to be familiar with the schema name (not the label name) for each field because this is what is displayed.
Step 5:
Go ahead and start writing your letter as you would normally. When you need to add some dynamic data from CRM do the following.
- Place your cursor where you want the field to be placed
- Right click on the field in the XML Mapping Pane,
- Select Insert Content Control and choose Plain Text from the options as shown below.
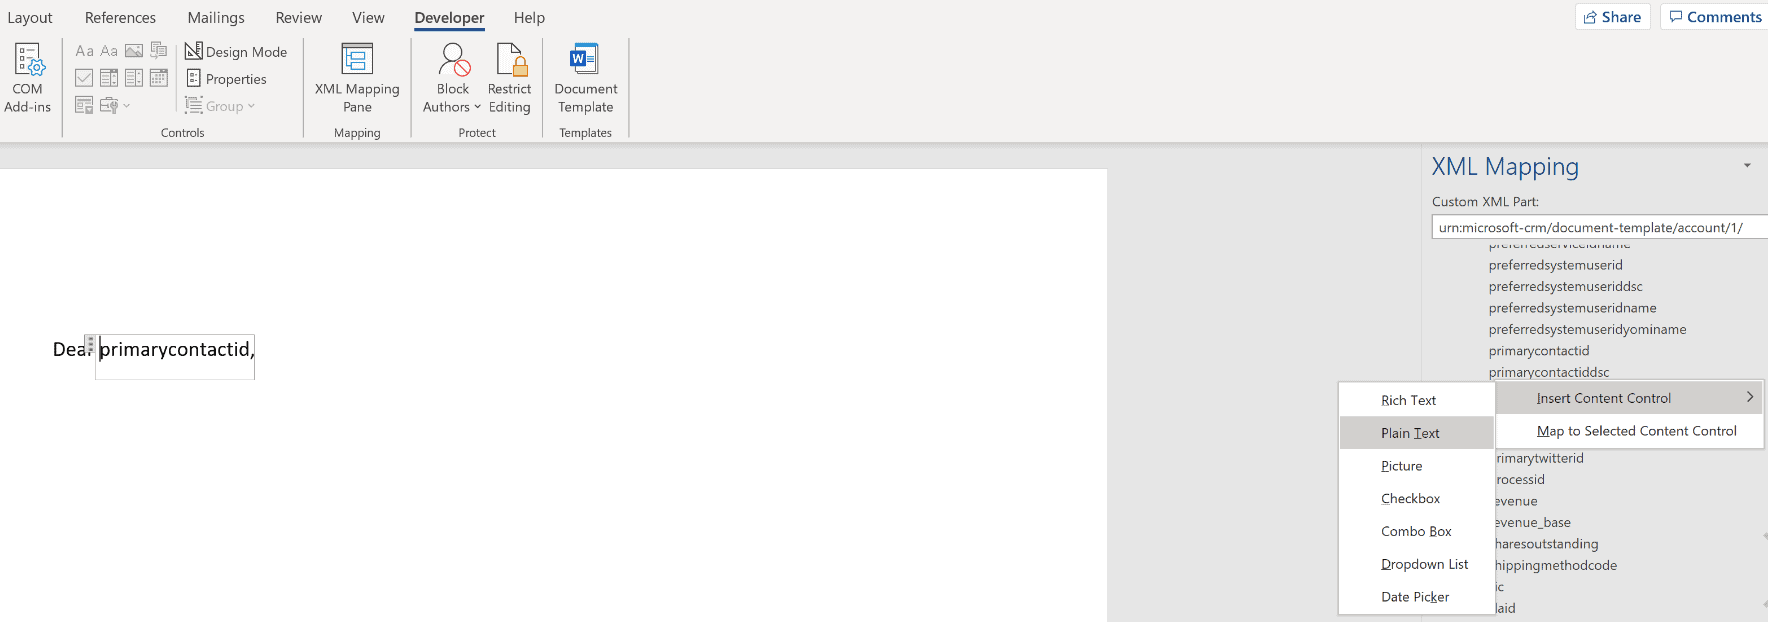
The chosen field appears where you placed the cursor in the Word template. In the above example I have chosen the primary contact name field (which has a box around it) from the Account entity to start my correspondence with “Dear name”. Continue to build up the template as required using this process to populate the Dynamics 365 fields.
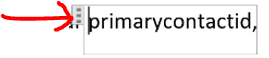
Tip: Click the ellipsis on the top left of the added field to select the box. This can now be copied for multiple use in the template. Also, highlight in this way to delete the field.
Step 6:
In addition to adding fields free format to the template, they can be added in tables. This is useful when creating a table with multiple entries from the same field e.g. invoices with dates and amounts or for customer service cases with dates, description and resolution.
To do this, select where in the template you would like the table, then go to the Insert tab, Table and choose its size. Once inserted highlight the blank fields in the table, then right click on the entity you would like to add fields from in the XML Mapping Pane. Then click Insert Content Control, then click repeating as shown below.
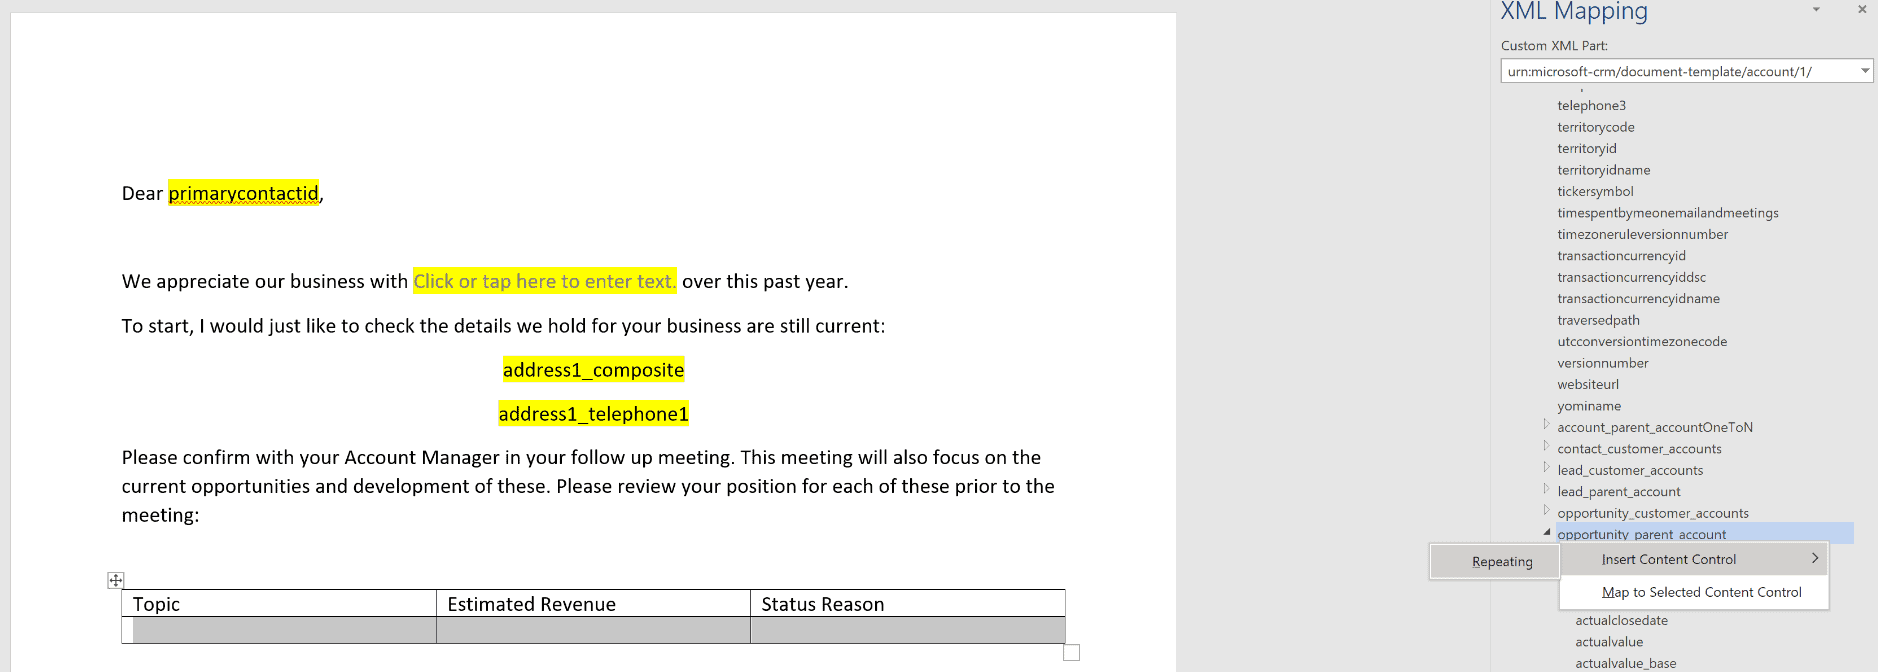
Now you have done this, add the (repeating) fields to the table as per step 5
Continue to create your template. Below I have highlighted in yellow where Dynamics fields have been added to my template.
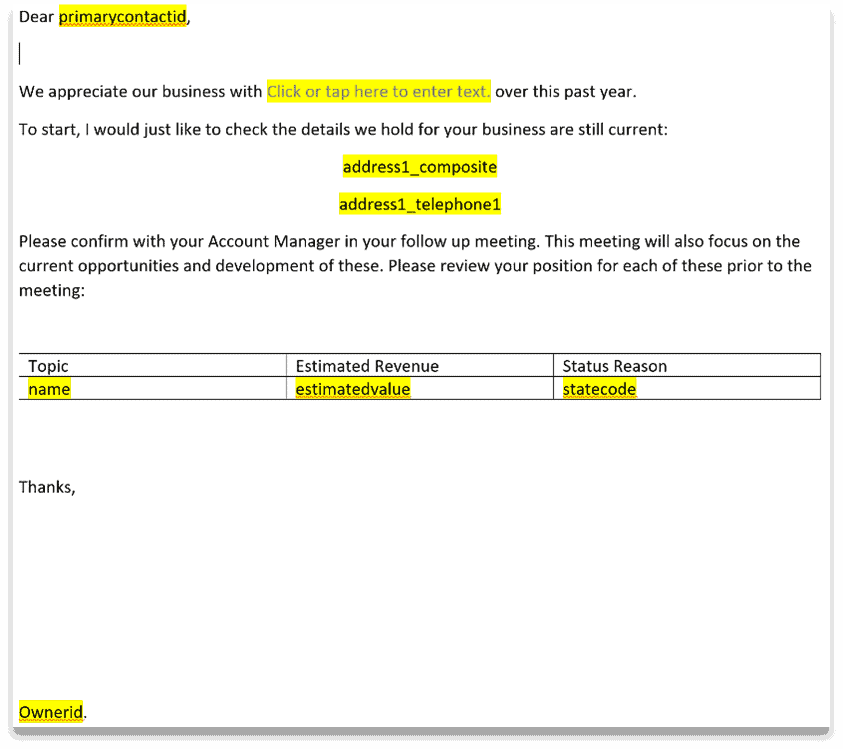
When you have finished adding fields it is a good idea to save your template with a meaningful name (e.g. “Contact Summary Letter”). As I am only creating a template for the purposes of a blog post I have not updated the name of the template and have left the name as it was when i downloaded it.
This template is now ready to be uploaded and used with any Account record. The highlighted fields will dynamically populate with the required information relating to that record.
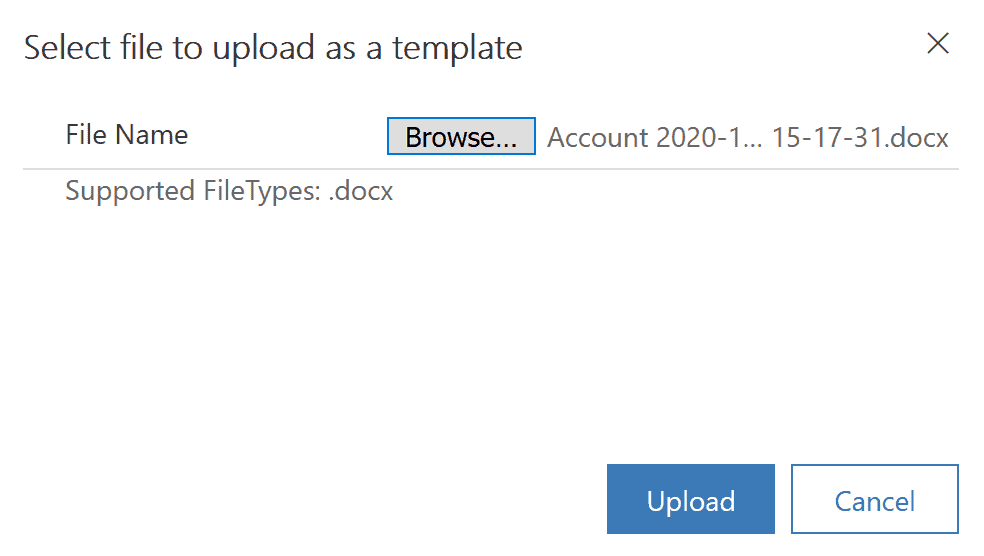
Step 7:
Once saved, you can upload the template back into Dynamics by clicking on the ellipsis/Word Template (in the ribbon):

Browse to select your saved file and click Upload:
Note: Ensure the template is safely saved if you would like to keep it as the source file. This will enable changes to the template to be made at any time. If the original file is lost a new one will have to be created.
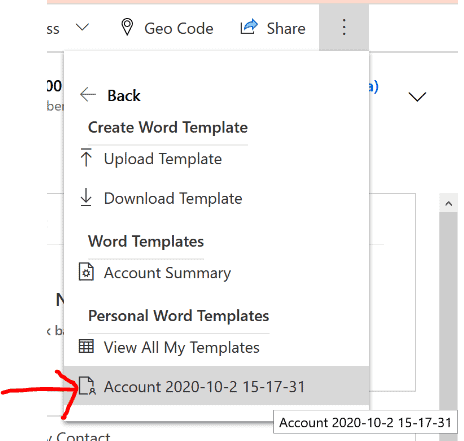
Step 8:
Now the template is ready to use. Navigate to an account record and click the Ellipsis in the ribbon/Word Template and choosing your file under your Personal Word Templates:
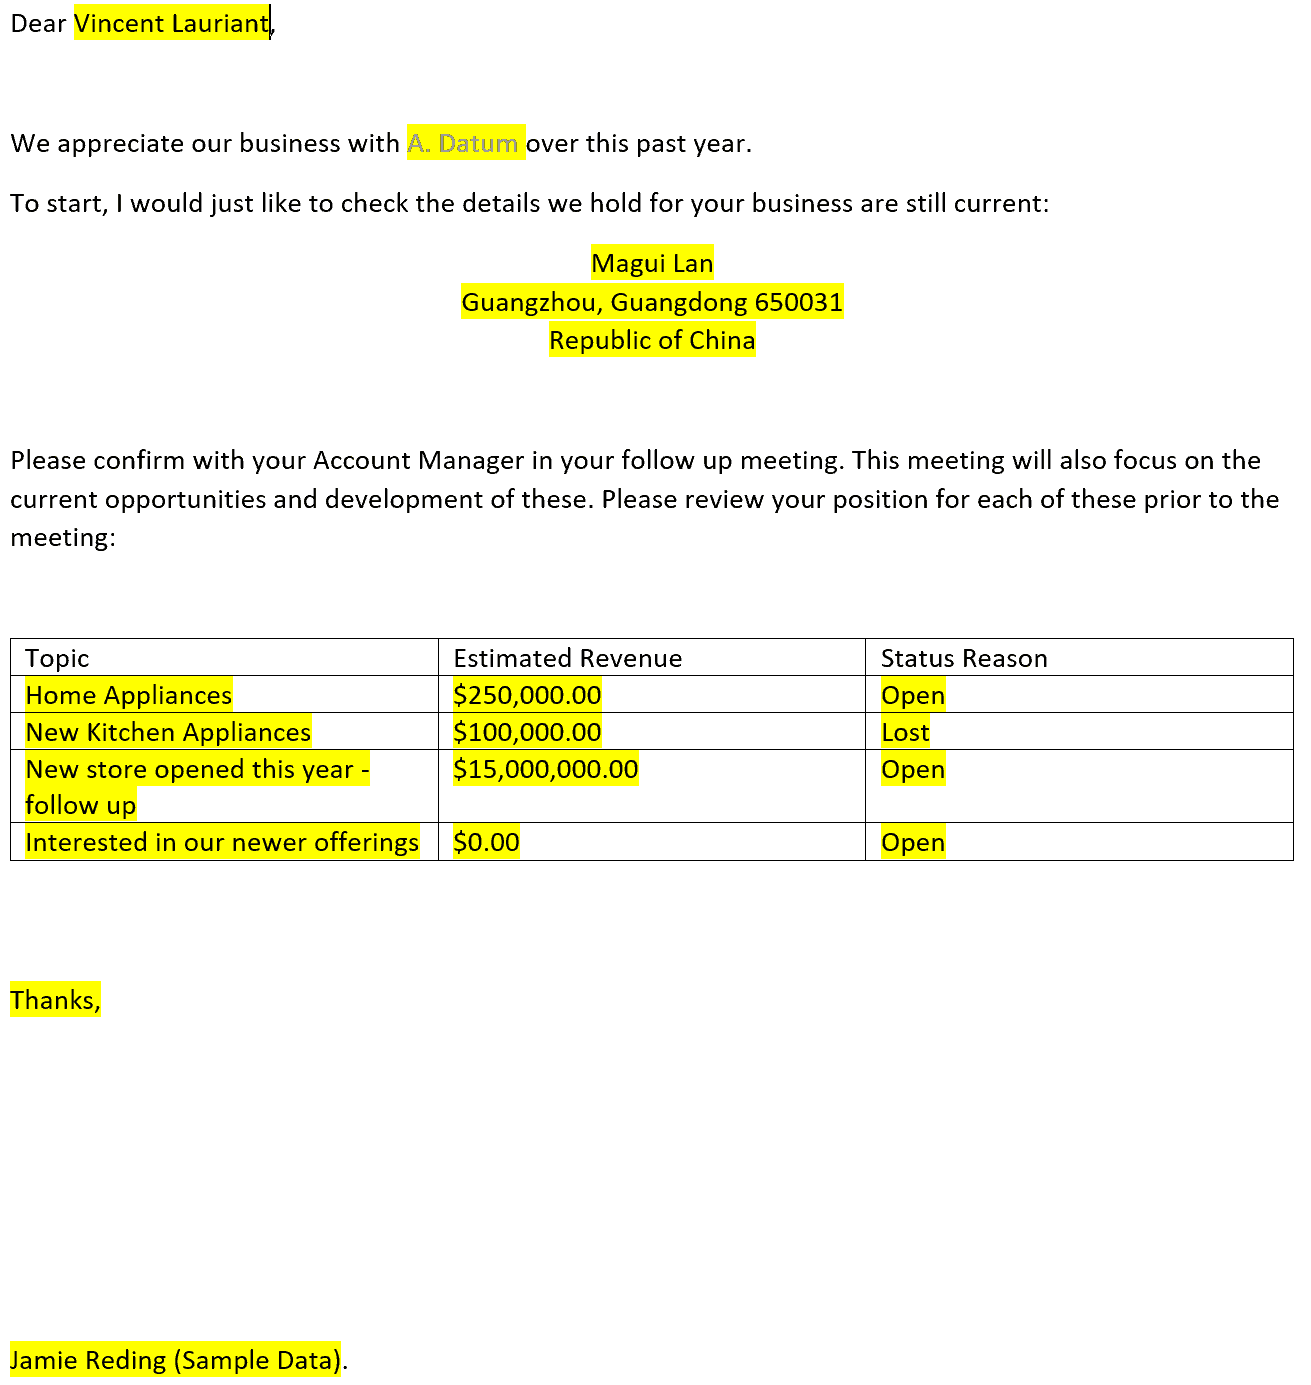
Step 9:
You can now open/save the auto-populated template and use as a regular Word document. It is still a standard Word document so can have headers, logos and signatures in. You can email, pdf. or print the document:
As this is a template personal to you, it may be useful for a system administrator to create company required templates so that anyone is able to use it, dependant on security. Security roles can also be set up by system admin.
If you are a system administrator, then you can upload the template to the global templates area in Document Management Settings and it will be available to everyone
The Limitations?
A limitation is that you can only create the document for one Dynamics record at a time and there is a maximum of 100 automated entries that you can add in the template.
What can I learn?
Functionality like this requires a little thought and preparation. But, in the long run, it can automate mundane tasks and creates efficiencies and a better user experience. In my experience, I have seen repetitive tasks being performed by staff daily, weekly and monthly. Sometimes the tasks are “saved up” so that all similar tasks can be completed at the same time which is often at the detriment of the customer receiving information on time. I have also seen identical tasks repeated across the business, be it 30 minutes or 3 hours, the collective time-saving when you do the maths is often breath-taking.
If you want to Create Dynamics 365 Word Templates and have any questions, get in touch with me and I’ll be happy to answer your questions. Also, if you would like to see some more options for advanced document generation you can take a look at XpertDoc for Dynamics 365.
You can find more information on creating Word templates on the Microsoft Docs page.
Rocket CRM are always happy to hear from you. Please get in touch and tell us about your CRM requirements.
ABOUT ROCKET CRM
Rocket CRM is a Microsoft Dynamics 365, and a platinum Click accredited partner, helping small to medium-sized businesses and charities harness the power of scalable CRM technology. Our mission is to make powerful CRM software simple with custom-built, user-focused solutions.
Website: rocketcrm.co.uk
Podcast: RocketPod
Social: LinkedIn